Weapons and Tactics
Basic Fighter Maneuvers (BFM)
Basic fighter Maneuvering (BFM) is performed by fighter aircraft during air combat maneuvering (ACM). They are generally grouped into two categories:
It is easy to fall into the trap of considering BFM to be a series of set maneuvers providing a foolproof recipe for a dominant position. The reality is that BFM is a series of fluid and often improvised proactive and reactive actions, varying infinitely according to range, altitude, speed, aircraft type, weapons system type and any of an enormous range of other factors. BFM is normally considered to be one versus one, where ACM is applied to three or more aircraft. In military training, BFM is often conducted against an adversary in the same type of aircraft. This allows the pilot to fly against a machine with known performance values and allows aircrew to build their awareness of important concepts such as sight picture, rates of closure and line of sight rates that are cues to being successful in the visual arena. Dissimilar BFM, is BFM performed by aircraft of two separate types (such as F-16 vs F/A-18). This training is valuable in that both pilots are not as aware of the performance capabilities and characteristics of the other aircraft and, therefore, must rely on the fundamental BFM principles and evaluation/decision making skills to manuever to an advantageous position versus their opponent. This type of training, while less common, is the most beneficial for aircrew once basic BFM skills are mastered. 1. BFM principlesThere are three basic situations in Air combat maneuvering requiring BFM to convert to a favorable result. The three situations, and the primary goals of a pilot in that situation are:
Basic
Combat Maneuvers
|
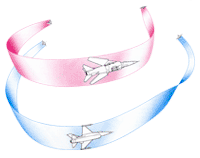
The aileron roll is a simple maneuver that maintains initial heading and transverses around the aircrafts longitudinal axis, which runs nose to tail.

Aileron Roll
Figure 1-1
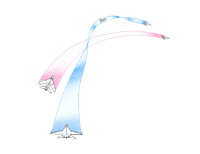
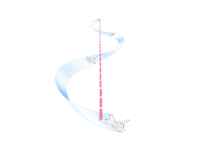
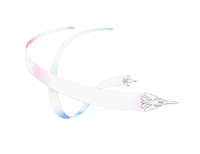
The Barrel Roll is a more complex maneuver that requires a constant change of motion about all three axes. A climbing turn in either direction should be performed to the point that the aircraft is inverted and offset 90 degrees from the initial heading. The pull should continue with a gradual turn in the opposite direction until established wings level to a return to the initial heading. While re-established on the original heading, the Barrel Roll will end offset to the left or right of the initial course line.

Barrel Roll
Figure 1-2
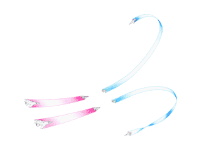
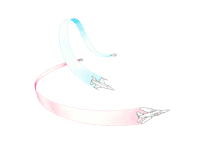
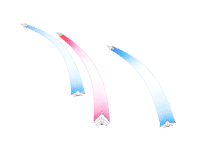
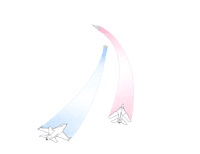
This is a maneuver primarily used to reverse your course 180 degrees in a hurry. It can be utilized to re-engage the enemy behind you or to fly over a ground target for visual identification then strike on the return. A 30-degree dive for ground attack is a standard parameter.

Half-Cuban 8
Figure 1-3
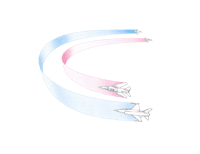
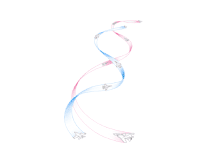
| 4. Full-Cuban 8 |
The Full-Cuban 8 is the ideal maneuver for multiple passes on a ground attack mission.

Full-Cuban 8
Figure 1-4
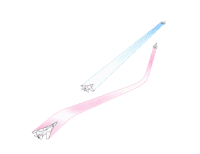
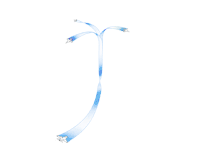
| 5. The Wing Over |
The wing over is another maneuver for reversing your course very quickly. To increase the turn even faster, over-bank at the peak can be initiated.

Wingover
Figure 1-5
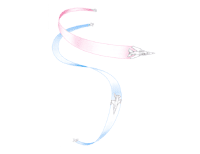
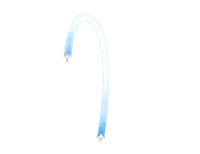
Max Immelmann, a WWI German fighter pilot, invented this maneuver. It allowed for "loft bombing" without flying over the target. It also was a way to reverse course and gain altitude after the attack to cut down the chance of getting hit by ground fire.

Immelmann
Figure 1-6
| 1. The Shackle |
The Shackle is utilized in a Combat Spread formation and can be executed in an offensive or defensive posture. It’s designed to throw your opponent(s) off guard and render decision-making and a shooting solution much more difficult. It is a criss-cross maneuver between a lead and his wingman and is initiated by the verbal command, "Shackle". The lead should designate him self as either the high-boy or the low-boy prior to the maneuver. The wingman’s responsibility is to react properly to the given commands. In an offensive posture the flight will more than likely resume the initial course. But in a defensive posture, the Shackle command can be given to engage a 180-degree turn back into the chasing bogey(s).


The Shackle
Figure 2-1
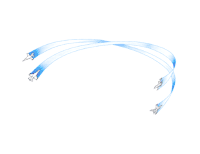
| 2. The Yo-Yo |
The YO-YO is the ideal maneuver to initiate when your opponent may have a better turning radius in a flat turn than you do. The Yo-Yo is divided into two types, The High Yo-Yo as seen in Figure 2-2a is best employed at a low altitude and/or in an excessive energy state. It’s ideal for bleeding off energy to getting inside the bogeys turn radius, therefore, rolling in behind him for the kill.

High Yo-Yo
Figure 2-2a
The Low Yo-Yo is best performed when at a higher altitude and/or in a low energy state. The initial dive as illustrated in Figure 2-2b will fly you below the bogeys flat turn path and get your energy state back up, therefore, generating your turn radius inside the bogey’s and lagging in behind him for the kill.

Low Yo-Yo
Figure 2-2b
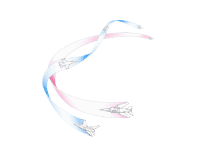
| 3. The Scissor |
All while flying canopy to canopy, you will learn to develop the timing to throttle back, extend a notch or two of flaps, and cross up your controls to bleed off just enough speed to allow the bogey to creep out in front of you for the shot.
This takes a lot of practice.

Figure 2-3a

The Rolling Scissor Technique
Figure 2-3b
Now that the basics of maneuvering your aircraft in a combat environment have been covered, this section will show you how to use these skills in a team environment. The basic formations and flying techniques are discussed in the Blacksheep Carrier/Formation Guide. Any of those formations can be utilized in Aerial Combat. It will be up the Flight Lead to determine how he wants to deploy his particular group.
Just getting the following tactics in your head will not be enough. You have to learn how to fly and communicate as a member of a team or you and your wingman will just get killed. All ways try to generate a situation where there are more of you in an engagement than bogeys. In short, STAY TOGETHER. Twelve guns on target are always better than six.
| 1. Fight Positions and Designations |
As illustrated in Figure 2-4, these are the positions designated in a typical Division or Flight of four aircraft. A Division can be broken up into two groups to execute tactics. Some of these tactics will be seen later on.

Dash 3 Dash 1 Dash 2 Dash 4
Finger-Tip 4
Figure 2-4
This tactic may be utilized against a bomber formation or a group of enemy fighters. As illustrated in figure 2-5, the flight leader may choose the option to attack from the forward quarter, or swing around behind the bogeys. This is a decision based primarily on where the sun is in relation to the target. All ways try to attack out of the sun. In direct line with the sun, the enemy can neither see you or his gun site.

Single-Side Offset
Figure 2-5
This is a tactic designed to be like the "old one-two punch". The flight lead would designate who would be the forward attacker based on which direction the attack would commence in relation to the bogey or what formation his flight is in. Again, this attack can be employed on fighters and bomber formations. Flying out of the sun in-trail will help hide your numbers in the glare.

Trail Intercept
Figure-2-6
| 4. The Sweep |
The Sweep Attack is ideal for enemy bombers locked in on an attack run or fighters trying to get to home plate as quick as possible. In the later scenario, the fighters are usually "Winchester" (out of ammo) and easy pickin’s.

The Sweep
Figure 2-7
| 5. The Pincer |
This tactic is designed to get the enemy to expose his flank. While this a Pro scenario in the long run, it is a Con for a short period while one of your own is engaged two-on-one. The teammate assigned to hit their flank better be a good shot and the single ship better be able to "jink" and avoid being hit and set up the kill for his wingman. The Flight Lead will decide how to deploy the right people to do what they are best at.

The Pincer
Figure 2-8
| 6. Pincer Isolation |
This tactic is a great move against the un-wise for generating a two-on-one engagement. The intended target must be decided before the tactic is initiated. As shown in Figure 2-9, the fighters take an approximate thirty-degree cut away from each other to spread the bogeys out. Once the intended target is isolated, the decoy can disengage form the enemy wingman and help take out the initial designated target. Once defeated, the enemy wingman is also left with a two-on-one engagement. Keep in mind; the initial strike on the designated bogey does not have to be fatal. Get the initial targets flight performance degraded enough that you can disengage to engage his wingman that will be hot on your wingman’s tail. It’s highly probable that the decoy wingman will be able to finish the kill on the initial target.
The Con for this tactic is the Bogeys may recognize what you are doing. If they don’t bite on this tactic, you and your wingman are badly separated and the bogeys can turn the tables on you in a one-on-two engagement. Be prepared to adjust your tactics to the Pincer Attack.

Pincer Isolation
Figure 2-9
| 7. Three Plane Pincer |
This is a three-on-one engagement that is ideal for taking out enemy bomber(s) or out-gunned fighter formations. The Lead goes up the middle while the flanking wingmen take a shallow dive to generate more energy before turning hard into the flanks of the bogey(s).

Three Plane Pincer
Figure 2-10
The Drag is a good tactic to avoid the head-on attack. It is reminiscent of the Pincer tactic by exposing the enemy flanks to a wingman. This can be used in a dogfight, or against a bomber formation particularly if the bogeys have initiated the turn first.

The Drag
Figure 2-11
The Cross-Block is a great example of using the Shackle maneuver just before engagement. At the situation shown at position 4 in Figure-2-12, any tactic in this guide can be employed from there. The bogeys will be in a reactionary state of mind at this point to guess your next move; therefore, you will have the upper hand.

The Cross-Block
Figure 2-12
| 10. The Double Lead-Around or Pincer and Trail |
This four-on-two tactic is ideal for taking out bombers, and is obviously overwhelming in a dogfight scenario. The outboard fighters have the option to attack the bogey on their side, or overshoot and Shackle behind the enemy formation to swap targets if they go evasive.

Double Lead-Around or Pincer and Trail
Figure 2-13
| 11. Double Pincer or Double Option |
The following are combinations of what has been discussed earlier.

Double Pincer or Double Option
Figure 2-14
You may try to isolate the bogeys but they don’t bite. Bracketing the targets is a technique for keeping both of the bogeys between you and your wingman. Bracketing works great in a two-on-one scenario. It forces the bogey to make a choice, therefore, exposing him to your wingman for the Pincer attack.

Bracket Attack
Figure 2-15
| 13. The Stern Conversion |
This is a good example to maneuver yourself into a position where you are coming out of a cloud or the sun before you strike. In this attack, both bogeys will get hit. The right bogey gets it in the front right quarter while the second bogey gets it in the aft right quarter as you follow through the attack. Use this tactic on both bomber formations and fighters. In IL-2, if the bogey is aware of your presence and has you pad-locked, once you go into a cloud, his lock on you is gone. But in a 100% game in strict virtual cockpit, it’s more than likely he’ll never see you coming.

Stern Conversion
Figure 2-16
3. References
- http://www.tpub.com/content/aviation2/P-821/P-8210225.htm
- http://www.352ndfightergroup.com/virtual/protac/acm/maneuver.html
- http://www.352ndfightergroup.com/virtual/protac/acm/maneuver.html
- http://www.352ndfightergroup.com/virtual/protac/acm/maneuver.html
- http://www.352ndfightergroup.com/virtual/protac/acm/maneuver.html
- http://www.tpub.com/content/aviation2/P-821/P-8210249.htm
- http://www.tpub.com/content/aviation2/P-821/P-8210249.htm
- http://www.352ndfightergroup.com/virtual/protac/acm/maneuver.html
- http://www.352ndfightergroup.com/virtual/protac/acm/maneuver.html
- http://www.tpub.com/content/aviation2/P-821/P-8210249.htm
- Robert L. Shaw, Fighter Combat: Tactics and Manoeuvring, ISBN 0-87021-059-9. (One of the better books on BFM and ACM in general.)
Other Tactics